Introduction to iPads: Part 1--Hardware
Hardware basics
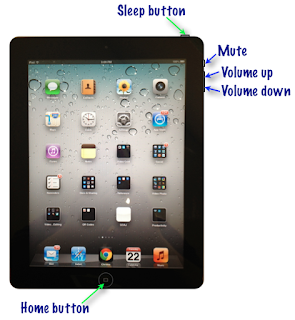
- Turning on / off the iPad: Hold the sleep button for five seconds until you see the apple appear on the screen to turn it on. To power down, hold the sleep button for five seconds, then "slide to power off."
- Putting the iPad to sleep: Press the sleep button. To wake it up, press either the sleep button or the home button. Use this feature to save the battery or to have students' full attention.
- Open an app: Tap once on the app you would like to open. If it is not on the first page, you can swipe through the pages with your finger to look for it. If you have many apps/pages, then tap the home button on the first screen of apps to access the search field to type in the app's name.
- Typing: The onscreen keyboard appears when a blinking cursor is observable. Place your finger where you want to type to move the cursor to that spot. Double-tap the spacebar to insert a period (including the space and the shift for the capital letter of the next sentence). To insert numbers, go to the number and symbol keyboard by pressing the number and symbol keyboard key.
- Scrolling: To scroll up or down a page, drag two fingers up or down the iPad.
- Zooming and shrinking: To zoom in, place two fingers on the iPad and stretch them apart. To shrink what is on the iPad, place two fingers on it, then pinch or pull them together.
- Cut, copy, or paste: To cut or copy text, highlight the word or words first. To highlight, double-tap a word, then use the blue circle bracket to pull to the beginning of the desired text to highlight, and the ending circle bracket to the end of the text. Then tap copy or cut. Tap finger at desired placement to paste text. Hold finger in place to see text under a magnifying glass. In case of mistake, simply shake iPad to undo.
- Screenshot: To create a screenshot, press the sleep button and the home button simultaneously. It will save in the Camera Roll album (see icon below).
 |
| Camera Roll album icon |
- Saving images: To save an image, hold finger on image until "Save Image" or "Copy" choices appear. Then select "Save Image" to store it in the Camera Roll album.
- Exiting apps: To minimize an app, tap the home button. To completely exit the app, double-tap the home button to view opened apps. Place finger on app until red "-" appears in upper left corner, and the icons are wiggling. Scroll through the list of running apps by swiping to the next page.
- Basic care for iPad: Use dry microfiber cloth to clean the iPad. Don't use cleaning products or compressed air. See Tip #9 for more information. Keep iPad (especially the charging doc) dry.
- Troubleshooting tips: If the iPad does not respond correctly, 1) check battery to see if it needs to be charged; 2) close apps that are minimized and running in the background (see "exiting apps" above); 3) shut down iPad normally, then restart it; 4) check how much available storage is left and if it's getting close to running out, take off some apps, pictures, video, or songs; or 5) if all else fails, try a hard reboot by holding the sleep button and the home button simultaneously for approximately ten seconds, let go once the Apple logo appears.
Final thoughts
There are more tips for using the hardware, but the above includes the basics for getting started. For more details, click here to download a PDF of the iPad IOS6 User Guide, or see Tips for iPads in Classroom.
In my experience, learning how to use an iPad is easier than other devices I've introduced to teachers and students. I'd like to hear about your experiences with it.
- How easy/difficult was it for you or your students to learn how to use an iPad?
- What would you add to this list?
- What questions do you still have?


Great Post Tracy! We hear so much about the apps used on the iPad that we forget to start with the basics. You have selected a comprehensive list which would get any novice started.
ReplyDeleteWill be sharing this post with some new users I know.
Thank you.
Thanks Nancy! As I'm getting ready to introduce iPads to teachers in our district this week, I'll be writing posts in preparation for this. I like publishing it because they have something to refer back to, they have something to share, and others can benefit also when they are ready to give it a try.
DeleteI appreciate your sharing and support!
Kind regards,
Tracy
Nicely done Tracy! I can truly "hear" your voice in your writing. Good solid information with easy steps for teachers new to iPads.
ReplyDeleteI know your presentation will benefit all.
JoAnn
Thanks JoAnn!
Delete